
Added two more finished frames to the Gallery section. Have spent this last month doing a lot of overtime, but still managed to get quite a bit done on the movie. There is now close to 7 minutes worth of footage completed.
The current scene I'm working on takes place in the Frankenstein Monster's lair - a cemetery. It took a couple of days to build the cemetery itself, painstakingly positioning each of the headstones individually. There's a special effect involved in this scene which requires some special planning in the rendering process. The Monster is carrying a lit torch, and in order to create this effect, I am using an After Effects plugin from Panopticum, called Fire. By supplying an alpha image of the object you want to burn (i.e. the head of the torch), the plugin creates a fairly good flame simulation.
However, since the torch passes behind a number of objects, each shot involving the torch has become a composite shot. The background elements, including the Monster and the other figures are rendered seperately from the foreground objects (gates, trees, etc). The flame plugin is applied to the top of the torch (also rendered seperately), and then sandwiched in between the foreground and background layers. The still I've uploaded to the gallery shows the lit torch, but in the full scene, the gates start off closed in the foreground.
I also wanted a nice, horror movie graveyard fog for the scene. Initially, I tried a fog object I found on the internet which used multiple foggy planes all ganged together to create a sense of depth; this proved too time consuming to be practical (I used it in the first scene of the movie, however - that shot of the Monster emerging from the mist demonstrates the effect).
For the graveyard, I opted to go the cheaper, faster route - simply applying a photo of Photoshop-generated clouds to a flat plane hovering above the ground, partially transparent. While this works ok (see the graveyard image for details), I'm trying something else in future shots. Currently, I'm using a Wave Plane (a water simulation that can morph and ripple) with the clouds photo applied. This way, the fog actually rolls and boils.
Monday, July 18, 2005
Saturday, June 18, 2005
Lipsynching
On the last two RAVEN movies, synching the character's lips to the recorded words was a labor intensive, painstaking chore. For FRANKENSTEIN VS THE WOLFMAN, I'm using an impressive Poser add on, called Mimic. Mimic can be fed a recorded line of dialogue, and automatically interprets the sound file and generates lip movement. As an added bonus, it also generates facial expressions! This has created much more expressive characters than I've had in the previous two movies, and has greatly reduced the amount of time required to set up individual scenes.
I'm working on the first indoor sequence in the movie, which takes place in a sewer. The soon-to-be Wolfman is spilling his origin story to a captive, soon-to-be meal. This sequence will be done in two parts; sundown and moonlight, separated by a flashback scene. The moonlight part of the sequence will involve the central Wolfman transformation, so I'm amped to start working on that - possibly as soon as tomorrow.
I'm working on the first indoor sequence in the movie, which takes place in a sewer. The soon-to-be Wolfman is spilling his origin story to a captive, soon-to-be meal. This sequence will be done in two parts; sundown and moonlight, separated by a flashback scene. The moonlight part of the sequence will involve the central Wolfman transformation, so I'm amped to start working on that - possibly as soon as tomorrow.
Saturday, June 11, 2005
Finally Added the Characters Page to the Site
Yep - by clicking on over to the brand new character's page here you can check out the who's who of characters from the movie, and the people who play them. It's not a complete list, as more characters have yet to be recorded and modeled, but we're underway.
I've been following my own advice - last weekend I animated about 30 seconds worth of stuff, and the computer has spent the bulk of the week rendering it out. It's not done yet, but I hope to get around to working on a new scene this Sunday. I have finally finished off the first sequence of the movie, which is also the first full beginning-to-end completed scene. Yaaay! Only 34 more to go!
I've been following my own advice - last weekend I animated about 30 seconds worth of stuff, and the computer has spent the bulk of the week rendering it out. It's not done yet, but I hope to get around to working on a new scene this Sunday. I have finally finished off the first sequence of the movie, which is also the first full beginning-to-end completed scene. Yaaay! Only 34 more to go!
Friday, June 3, 2005
How to Make 3-D Movies With Poser
I'm really getting derelict in my duties of updating this webspace. The job situation mentioned in my last post has been rectified (I survived the cuts, and am keeping my employment), but my hours have changed. This has cut down on the amount of time a day I can spend working on the movie. My new strategy is to animate as much stuff as I can on weekends when I have free time, and then let the computer do the work during the week. I am one shot away from having the first complete sequence finished for the movie.
Now, the question has become - how do you make a 3-D movie using Poser? The whole concept here is to photograph your subject from two perspectives, separated by the distance between your eyes (approx 2 1/2 inches). To do this, I put a reference object in the scene (namely a simple ball) and tell the camera to always Point At it. Where the ball is positioned will be the screen plane of the shot - anything coming between the ball and the camera will appear to come out of the screen, anything that falls behind it will appear to receed into the screen. The ball is hidden in the final render by simply turning it off. The final render of this shot becomes the Left Eye view. Then, I rotate the camera on the Y axis 2 degrees to the right, and re-render the scene. This is the Right Eye view.
This technique works best when the camera is facing the object straight ahead. When the camera is tilted to look up or down at an object, the Y axis becomes useless, and I have to manually track the camera to approximate the perspective shift. This has resulted in a couple of errors so far, which has resulted in too much parallax (the seperation between the final images when put together in 3-D). Too much parallax, or worse, a misregistered image (when the Right Eye image is slightly higher or lower than the Left Eye) can cause some serious eyestrain in the viewer. So, some of these shots had to be fixed by adjusting the Right Eye image later in post processing. There are two shots so far in this first sequence that will have slight black bars on the side of the frame, because I had to slide the images together to correct a problem with depth (objects that were supposed to be at the screen plane were too far in front of it).
The two final images, if they were rendered without problems, are combined in a program called Stereo Movie Maker to make both an anaglyph and field sequential version of the shot.
Wednesday, April 27, 2005
Voice Recording
It's been busy around here. There's a bit of a transition going on at my job (which could leave me out of one), so that's been on my mind lately. We rounded up a new group of voices and recorded them last week; we're now left with one major role to cast, and one or two supporting roles. Here's the cast list to date: Grace Carreno, Tom Zack, Charles Reeder, Meghan Campbell, Andrew Carlson, and Elaine Clarke. One of these days I'll actually get around to posting the cast photos!
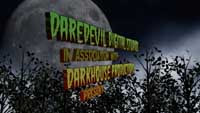
I went and designed much of the main title sequence after having an inspiration one night; I actually started trying to ape some of the typeface and graphics of the old 1930's movie trailers, but settled on something that looks like a 3-D version of something you'd see on late night Chiller Theater. The depth works great, and I'm happy.
I'm currently working on that opening sequence - another shot that has to be split into multiple layers to render without overloading the computer. This is taking longer than anticipated, but at least we're moving forward.
Tuesday, April 12, 2005
Steady As She Goes
Hit a bit of a setback, as the 20 second shot I was talking about in my last post had to be scrapped after a week's worth of work. It turns out I didn't calculate the axis of depth correctly for the 3D and both right and left eye views had to be trashed. This after rendering out six layers of elements per eye! The shot is now complete, and correctly registered, but talk about trying a man's faith.
I have moved on to other shots in the sequence, but progress is slow. I've abandoned the idea of animating everything and then coming back to render it later, in favor of setting up the animation and then rendering out the dual eye versions. This takes between 2-3 days per shot, and maybe more time will be required later, as the scenes become more complex. I'm doing this to check the final 3D version to make sure everything is correctly registered.
I have moved on to other shots in the sequence, but progress is slow. I've abandoned the idea of animating everything and then coming back to render it later, in favor of setting up the animation and then rendering out the dual eye versions. This takes between 2-3 days per shot, and maybe more time will be required later, as the scenes become more complex. I'm doing this to check the final 3D version to make sure everything is correctly registered.
Wednesday, March 23, 2005
Going Forward...
I have been able to achieve an acceptable level of production from Poser, so I guess that means we're back in business. I've also had to re-evaluate a couple of positions within the last week.
First, since Poser absolutely refuses to produce the opening shot of the movie, I've had to chop it into layers to get it done. Basically I'm doing it in passes - on this pass, we render only the ground; on the next, the kids walking; on the following, the trees, etc. The shot in question is an overhead tracking shot that follows the three children from our story to a grisly scene in the woods. It will consist of at least five seperate layers. Once each layer is rendered, I'll composite them together in After Effects. I did this sort of thing a lot with the final sequences of RAVEN 2.
At this point, the one minute sequence which I animated back in January - and have been rendering out ever since - is done. I'm using this as my test sequence, and have prepared a DVD with the three versions of it for study. Although my wife says that my character animation has improved since the RAVEN days, the overall look of the footage is taking some getting used to. The desaturated color scheme is more severe than it appeared on my PC monitor. In order to accomodate the 3D, I overlit everything - and on TV it looks almost too bright (especially since the scene in question takes place by moonlight).
Due to the nature of interlaced TV fields, the field sequential 3D version displays more noticable jagged lines on objects than I was anticipating. The anaglyph version requires significant tweaking of the TV's color settings to achieve a tolerable effect (it does work, but the depth effects are not as pronounced as the field sequential version, and ghosting is a fact of life). Maybe this could be remedied by including a couple of setup screens on the eventual DVD.
And, the streaking title sequence will probably not make it to the final film. The style is just not in keeping with the tone of the movie. Maybe I can use it in the trailer...
I keep looking at the thin script sitting on my desk and wondering why I wanted to make this movie so complicated. It's scope, in both the number of principal characters and its locations, are much more ambitious than the two RAVEN films. At this point, nearly four months after starting the project, it feels like I'm standing at the base of a mountain, looking up at the summit - and it's beginning to dawn on me just how much work is going to be required to pull this off. I'm toying with the idea of taking another pass at the script and paring it down, striking most of the peripheral characters and making it more of a three character piece: the little girl Leeta, the Frankenstein Monster, and the Wolfman.
We'll see what happens. The computer's time for this week, and maybe some of next week, will be taken up with rendering out right and left pairs of each layer of this first shot. More as it happens...
Subscribe to:
Posts (Atom)
